
Bagi Anda yang mempunyai webserver yang terpasang pada sistem operasi baik yang berbasis Linux maupun Windows, tentu tidak asing mendengar istilah Load Balancer (LB). Sesuai namanya, LB mempunyai fungsi sebagai penyeimbang trafik pada jaringan. LB dapat juga berperan sebagai Proxy yang membagi trafik baik yang masuk maupun yang keluar. Metode algoritma yang diterapkan pun beragam, bisa menerapkan Round Robin, Ratio, Fastest ataupun Least Connections.
Salah satu tool yang populer digunakan oleh web server administrator adalah HA Proxy. Dikutip dari website resmi http://www.haproxy.org/.
HAProxy is a free, very fast and reliable solution offering high availability, load balancing, and proxying for TCP and HTTP-based applications. It is particularly suited for very high traffic web sites and powers quite a number of the world’s most visited ones. Over the years it has become the de-facto standard opensource load balancer, is now shipped with most mainstream Linux distributions, and is often deployed by default in cloud platforms. Since it does not advertise itself, we only know it’s used when the admins report it 🙂
Intinya HA Proxy bisa digunakan sebagai LB untuk beberapa webserver yang dikelola. Sehingga untuk website dengan trafik yang tinggi, tidak mungkin hanya menggunakan 1 (satu) server saja. Diperlukan 2 (dua) atau lebih server untuk menangani trafik yang tinggi. Berikut contoh topologi yang dapat diterapkan dengan HA Proxy.
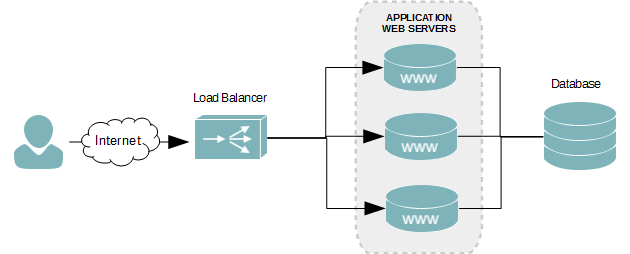
Skenario
Menggunakan 1 (satu) Load Balancer Haproxy dan 2 (dua) server dijadikan webserver serta 1 (satu) database serever untuk sebagai berikut.
- Hostname: haproxy
OS: Ubuntu
Public IP: 1.1.1.1
Private IP: 10.0.0.100 - Hostname: webserver1
OS: Ubuntu
Private IP: 10.0.0.1 - Hostname: webserver2
OS: Ubuntu
Private IP: 10.0.0.2 - Hostname: dbserver
OS: Ubuntu
Private IP: 10.0.0.4
Instalasi HAProxy di host haproxy
Menggunakan perintah apt-get di Ubuntu untuk memasang HAProxy.
# apt-get install haproxy
Untuk mengaktifkan HAProxy ketika server melakukan booting.
# nano /etc/default/haproxySet the
ENABLEDoption to1ENABLED=1
Untuk mengecek perintah apa saja yang dapat dilakukan terhadap service haproxy dapat dilakukan dengan perintah berikut.
# service haproxy
Usage: /etc/init.d/haproxy {start|stop|reload|restart|status}
Konfigurasi HAProxy di host haproxy
Pertama kita duplikasi file konfigurasi HAProxy yang asli sehingga ada backup file konfigurasi.
# cp /etc/haproxy/haproxy.cfg/etc/haproxy/haproxy.cfg.orig
Buka file konfigurasi dengan editor kesayangan.
# nano /etc/haproxy/haproxy.cfg
Berikut contoh konfigurasi HAProxy.
global
    log 127.0.0.1 local0 notice
    maxconn 2000
    user haproxy
    group haproxy
defaults log global mode http option httplog option dontlognull retries 3 option redispatch timeout connect 5000 timeout client 10000 timeout server 10000listen appname 0.0.0.0:80 mode http stats enable balance roundrobin #algoritma yang digunakan option httpclose option forwardfor server web1 10.0.0.1:80 check #ip address webserver1 server web2 10.0.0.2:80 check #ip address webserver1listen stats :1936 mode http stats enable stats hide-version stats realm Haproxy\ Statistics stats uri / #url untuk melihat statistik haproxy stats auth myUser:myPassword #akses ke statistik haproxy
Jalankan service HAProxy.
# service haproxy start
Jika haproxy sudah berjalan tanpa error, maka silakan buka web browser lalu ketikkan alamat IP Public milik haproxy.
Untuk mengecek log bisa dilihat dengan perintah berikut.
# tail -f /var/log/haproxy.log
Untuk melihat statistik haproxy silakan buka webbrowser, lalu ketikkan alamat haproxy (http://10.0.0.100:1936/). Akan tampil popup otentifikasi, isikan username dan password sesuai konfigurasi (myUser & myPassword).